Overview
This document covers how to build some basic Pay Rules in order to create a Rule Group. This does not outline all the types of rules you can build. Before you replicate any of these rules, you will need to determine the rule requirements for your business.
If you need more complex rules built, please contact support@astutepayroll.com.
Sample Award - Non-shift Worker
| Span of Hours |
Ordinary Hours Mon-Fri, 7am to 7pm |
|
Ordinary Hours Sat, 7am to 12:30pm |
|
|
Max Daily Hours = 10 |
|
|
Max Weekly Hours = 38 |
|
|
Minimum Engagement on Saturday = 3 hours |
|
| Payment of Overtime |
Overtime worked between Monday and Saturday - paid as first 2 hours at time and a half, then double time thereafter. |
|
Ordinary Saturday hours paid at time and a quarter. |
|
|
Sunday hours paid at double time |
|
|
Public holidays paid at double time and a half |
|
| Allowances | Meal allowance - if employee is provided less than 24 hours notice and is required to work more than 1.5 hours overtime |
Before you start building rules, you should:
-
Check that your Pay Items have been created and configured.
-
Check that your Rate Cards have been created with all rates entered.
The rules are built to tell the system how to treat anything other than the employee’s ordinary hours. You are telling it what overtime is and how to pay/charge those hours. You can also tell it how and when to pay things like allowances.
How to Build Rules for the Sample Award
- Ordinary Hours Mon-Fri, 7am to 7pm
- Ordinary Hours Sat, 7am to 12.30pm
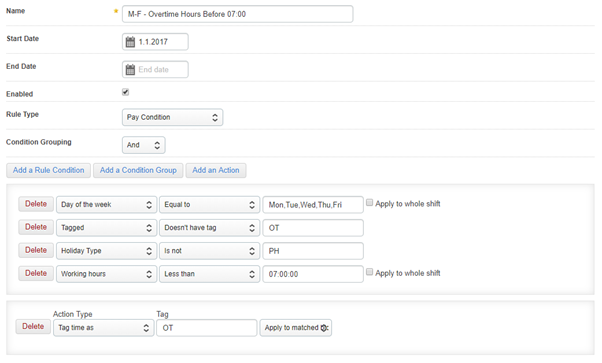
For these rules, we will need to set up a Tag to indicate that if an employee works before 7am or after 7pm on a weekday, this is overtime. Similarly, hours worked before 7am and after 12.30pm on a Saturday will be considered overtime.
Tags put labels on blocks of time. We can then use those labels to search for these blocks of time and apply specific actions to them later on in the rule group.
Go to Config > Payroll > Pay rules > Create New Pay Rule > enter the details per the screenshot below > Save.
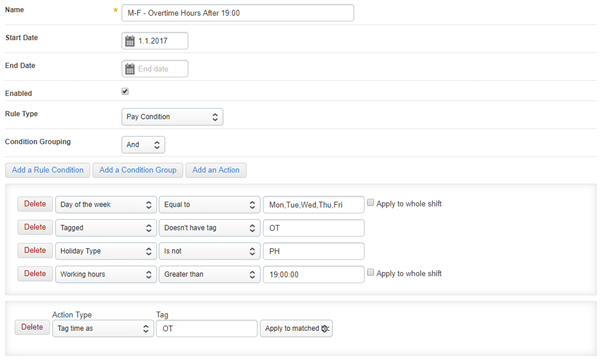
You can now clone this rule to make other rules with similar conditions.
-
Go to Config > Payroll > Pay Rules.
-
Tick the check box next to the ‘M-F - Overtime Hours Before 07:00’ rule.
-
Click With Selected… > Clone Pay Rule.
-
Update the name to ‘M-F - Overtime Hours After 19:00’.
-
Change the working hours condition to ‘Greater than’.
-
Change the time to 19:00:00.
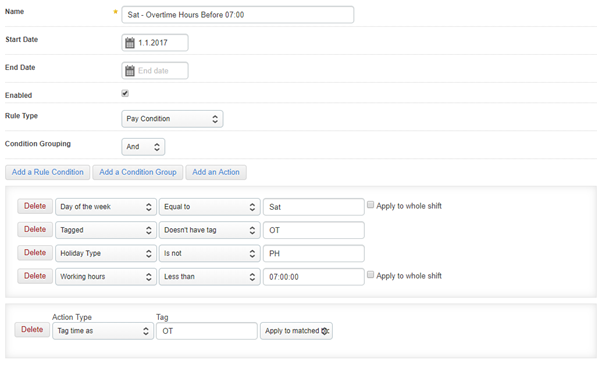
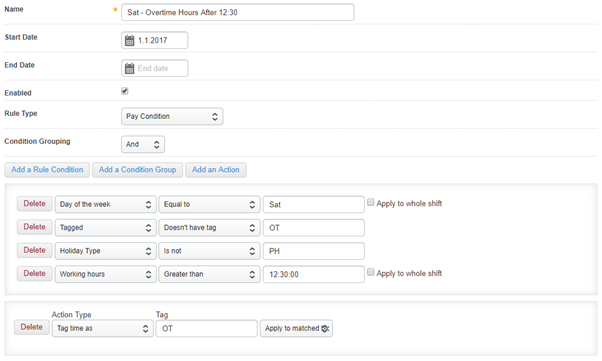
We’ll clone one of these rules twice more to build the Saturday overtime tags.
- First 2 hours of OT paid at time and a half, then double time thereafter
Once the tags have been created, we need to create rules to determine how that overtime will be paid. This is where you refer to Pay Items other than your base pay item and Rate Cards, if you’re using these.
If you’re using multipliers, select the relevant Pay Item. You’ll also have the option to use a separate Charge Item if these are set up in your portal.
To create the first rule, go to Config > Payroll > Pay rules > Create New Pay Rule > enter the details per the screenshot below > Save.
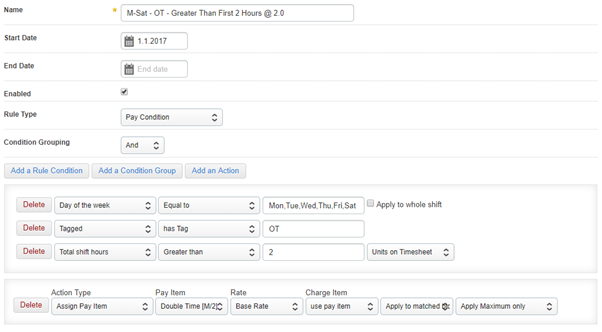
Once you have created this rule, you can use it to clone the rule for double time after 2 hours of OT.
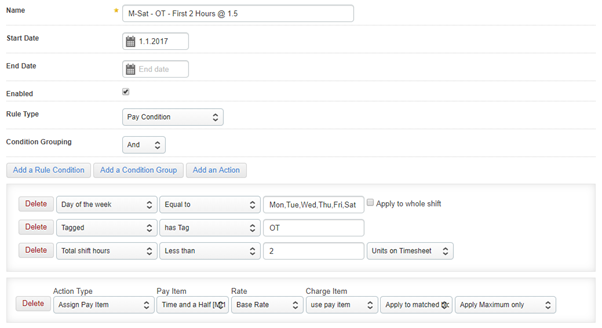
What this rule looks for is hours worked on Monday to Saturday that meet the criteria in our earlier Tag rule. We then want it to take the first 2 hours that meet that criteria, and assign our Overtime x 1.5 rate to those hours.
The second rule is looking for anything over 2 hours that meet the OT Tag criteria, and telling it to assign the Overtime x 2.0 rate to those hours.
- Ordinary Saturday hours paid at time and a quarter
For ordinary weekend hours such as this, you may need to use a Penalty Rate rather than Overtime. When you set up these Pay Items, you can choose to have them accrue super and leave, unlike Overtime items.

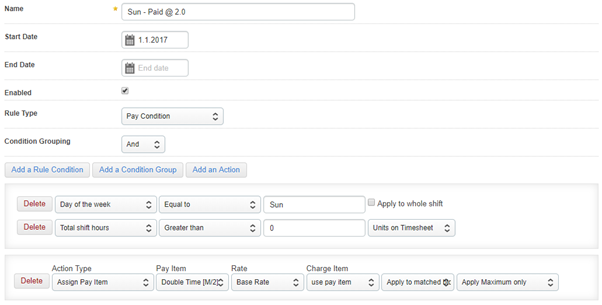
- Sunday hours paid at double time
This is a nice simple rule to say any hours worked on a Sunday that aren’t already tagged as Overtime need to be paid at double time.
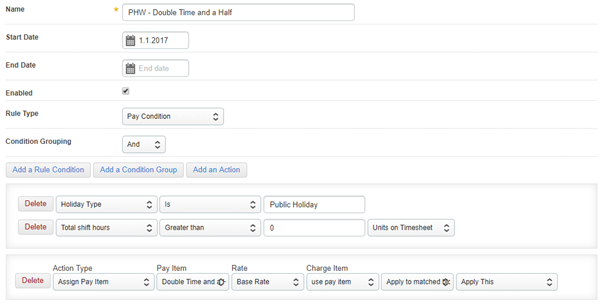
- Public holidays paid at double time and a half
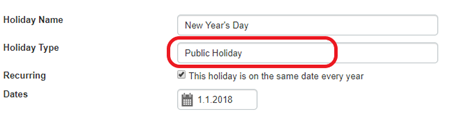
When you set up your Holiday Groups, you will have set a Holiday Type against each public holiday created. You’ll need to take a note of what this is if you need to set up rules for public holidays.
Go to Config > Payroll > Holiday Groups > click on the Holiday Group > click ‘edit’ on the holiday and check the ‘Holiday Type’ field.
The rule will then look like this:
- Max Daily Hours = 10
This rule will tag anything over 10 ordinary hours in a day as overtime.

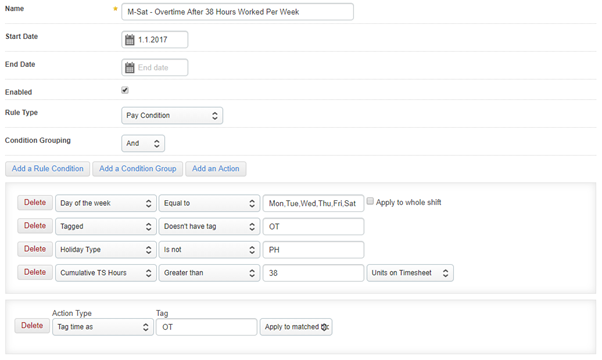
- Max Weekly Hours = 38
For maximum weekly hours in this particular instance, Saturday forms part of the ordinary working week.
When building this rule, we’ll tell the system to look at Monday to Saturday. You may have other weekly overtime rules that only include Monday to Friday, or ones that look at the entire week.
- Minimum Engagement on Sunday = 4 hours
This rule might not be specific to a particular day, so you can open it up to any day of the week. It might also be something that applies to Public Holidays or weekends.
Please note that this type of rule will automatically pay the shift minimum to the worker. If you engage in casual staff and they go home on their own accord the shift minimums may not be applicable.
In this instance a flagging rule to indicate that the worker worked less than the minimum may be more suitable, then Payroll can decide at a Pay Conditions level if the minimum payment is in fact entitled. (Please provide a sample of both types).
Please also note that the min payment rule should be set as a work structure rule not a pay condition rule.

- Meal allowance - If employee provided less than 24 hrs notice and is required to work more than 1.5 hours overtime)
For this type of allowance, we’ll use the ‘Manually Set on Timesheet’ Rule Type. This is because there isn’t a way to automate the ‘less than 24 hrs notice’ part of it.
This type of rule will allow the employee to select this allowance manually on their timesheet if they’re entitled to it.

In the timesheet, when a timeblock is added they will see the ‘Allowances’ drop down list appear and they can select the meal allowance.

Building the Rule Group
Once the Pay Rules have been created, we group them together in a Rule Group. The ordering of the rules is important. If they’re ordered incorrectly, the hours on the timesheet won’t be interpreted the right way.
To build your rule group:
-
Go to Config > Payroll > Rule Groups > Create New Rule Group
-
Enter a name
-
You can enter a Group and Tags if you want to
-
Enter a Start Date
-
Enter a Finish Date if required
-
Make sure the ‘Enabled’ option is ticked
-
Select a Holiday Group if applicable (or you can set this on the job)
-
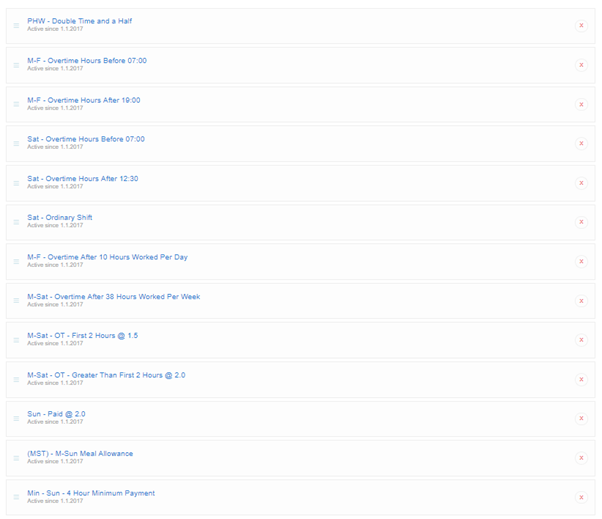
Select a rule that you need to include and click ‘Add Rule’. Repeat this step for all rules you need to include
-
Order the rules by clicking and dragging them to where they need to be. Generally the logic that you would use to manually interpret a timesheet would be the same order your rules would be ordered.
As a guide, public holiday rules will sit at the top of the list so other rules aren’t considered. This is followed by all of the rules that define a standard day, shifts and or overtime would be listed next, then rules that provide instructions on how to pay blocks of time. All manually set on timesheet rules can sit at the bottom of the rule group list.
You can always change the order of rules during testing if something is not working correctly. Once the order is correct, you shouldn’t need to go back in and make changes going forward.
Comments
0 comments
Please sign in to leave a comment.